Description
HOW TO: Excel to Excel
Background
This is a “HOW-TO” guide on using !Tsuite to read from an Excel spreadsheet and transport the data into another excel spreadsheet, either updating an existing row or inserting a new row depending on the incoming data and the destination data set.
This is very similar to the Excel to Access but this walkthrough is from excel to excel.
When dealing with Excel spreadsheet it is important to know that Microsoft locks the file and therefore throughout the whole process the spreadsheets are locked for other users. This is important to note for it may impact your processes.
Submitted by
Tim Lalonde
OS Version
NA
!Tsuite Version
all
Problem
Need to transfer data from an Excel Spreadsheet to a Microsoft spreadsheet
Solution
Preparation
To accomplish our task we create a Loader job, which once constructed will do all that is necessary to accomplish the final desired outcomes.
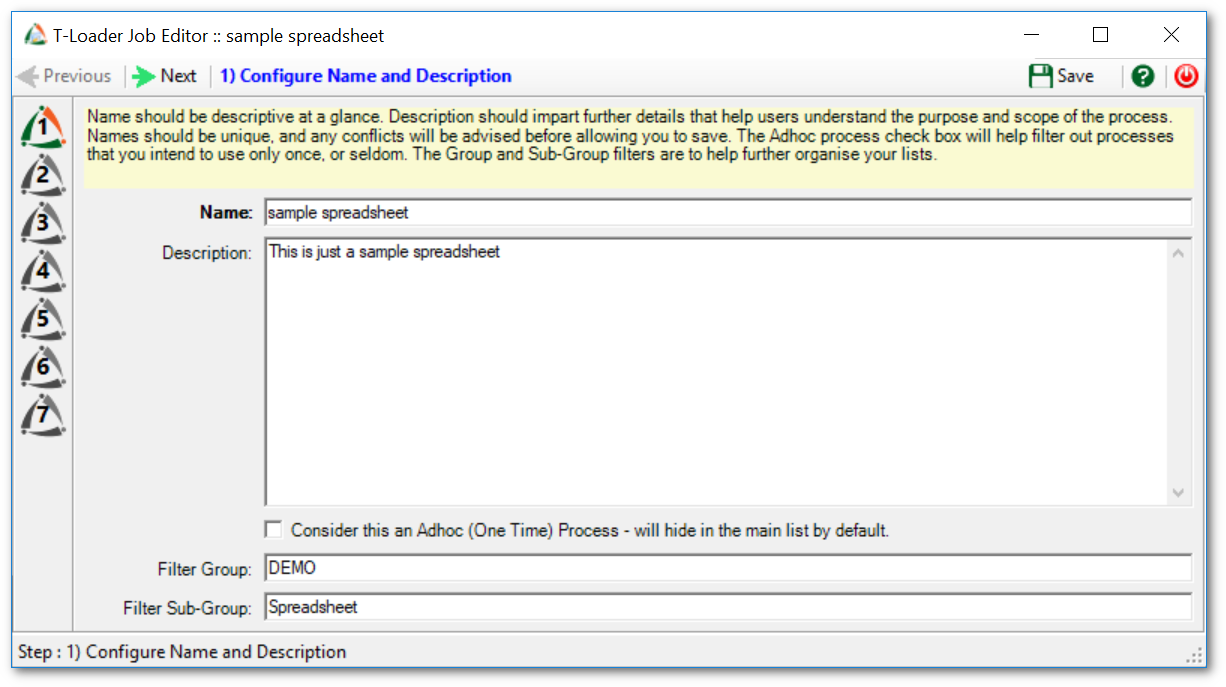
Step 1
First, we create a new !Tsuite Loader job, giving it a reasonable name and description, as well as any group filtering information desired.
Step 2
In the second stage of our job design we define the source and destination data points.
First we indicate where we are getting our data from. Because Microsoft Excel spreadsheets are accessed via the Microsoft Access Database Engine we must configure the data source details to use that provider. The type will be Database, the provider type OLE DB, and the connection string is constructed according to the model required for the Microsoft Access Database Engine.
The model for the connection string is:
Provider=Microsoft.ACE.OLEDB.12.0; Data Source={?}; Extended Properties=”Excel 12.0 Xml; HDR=YES”;
The “{?}” is the full path and file name pointing at your Excel spreadsheet file. And the extended properties identify the version of Excel and, in this case, whether the first row is a column name header. More information about connection strings for the ACE provider for Excel can be found at: http://www.connectionstrings.com/ace-oledb-12-0/
Next, we indicate where the data will be going to. This is the same as the input connection string with the exception it must have an existing Excel spreadsheet to connect to. Confirm your fully qualified path name is used.
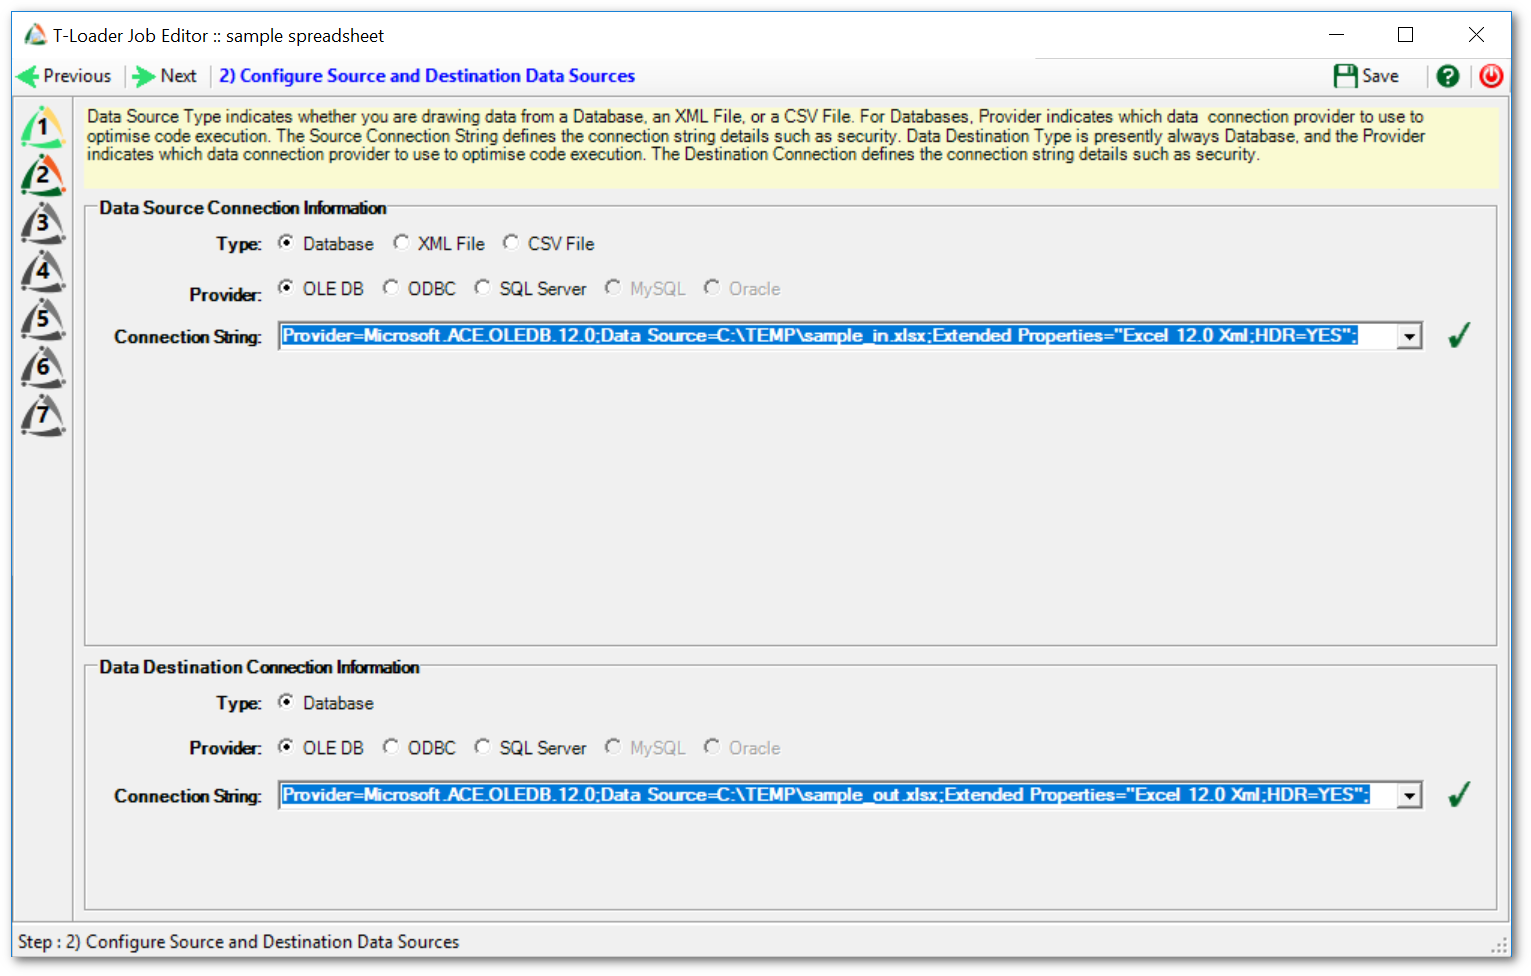
With the connections specified in the job we can now proceed.
Step 3
The third step specifies how we will pull data from Excel. Because Loader jobs pull single data tables at a time, we need only to specify a SQL SELECT statement in a form the provider will interpret for Excel.
select [column1], [column2], [column3] from [test$];
The format for SQL to pull data from Excel is straightforward, and you can use an all-fields shorthand (the asterisk) or specify fields based upon the column names (if you used the “HDR=Yes” hint in your connection string). And the “table name” in an Excel workbook is the individual tab name. Here we have used the “Sheet1” tab. Square brackets should surround the tab name (they protect against spaces), and the tab name must be followed by a dollar sign ($). This is a necessity. It is also vital the tab name be exactly represented. So, for example, if the user has a tab named “my tab ” with a trailing space, the actual “table name” is “[my tab $]”. The most common errors people make here is that they forget the exact naming, or they forget to follow the name with the required dollar sign.
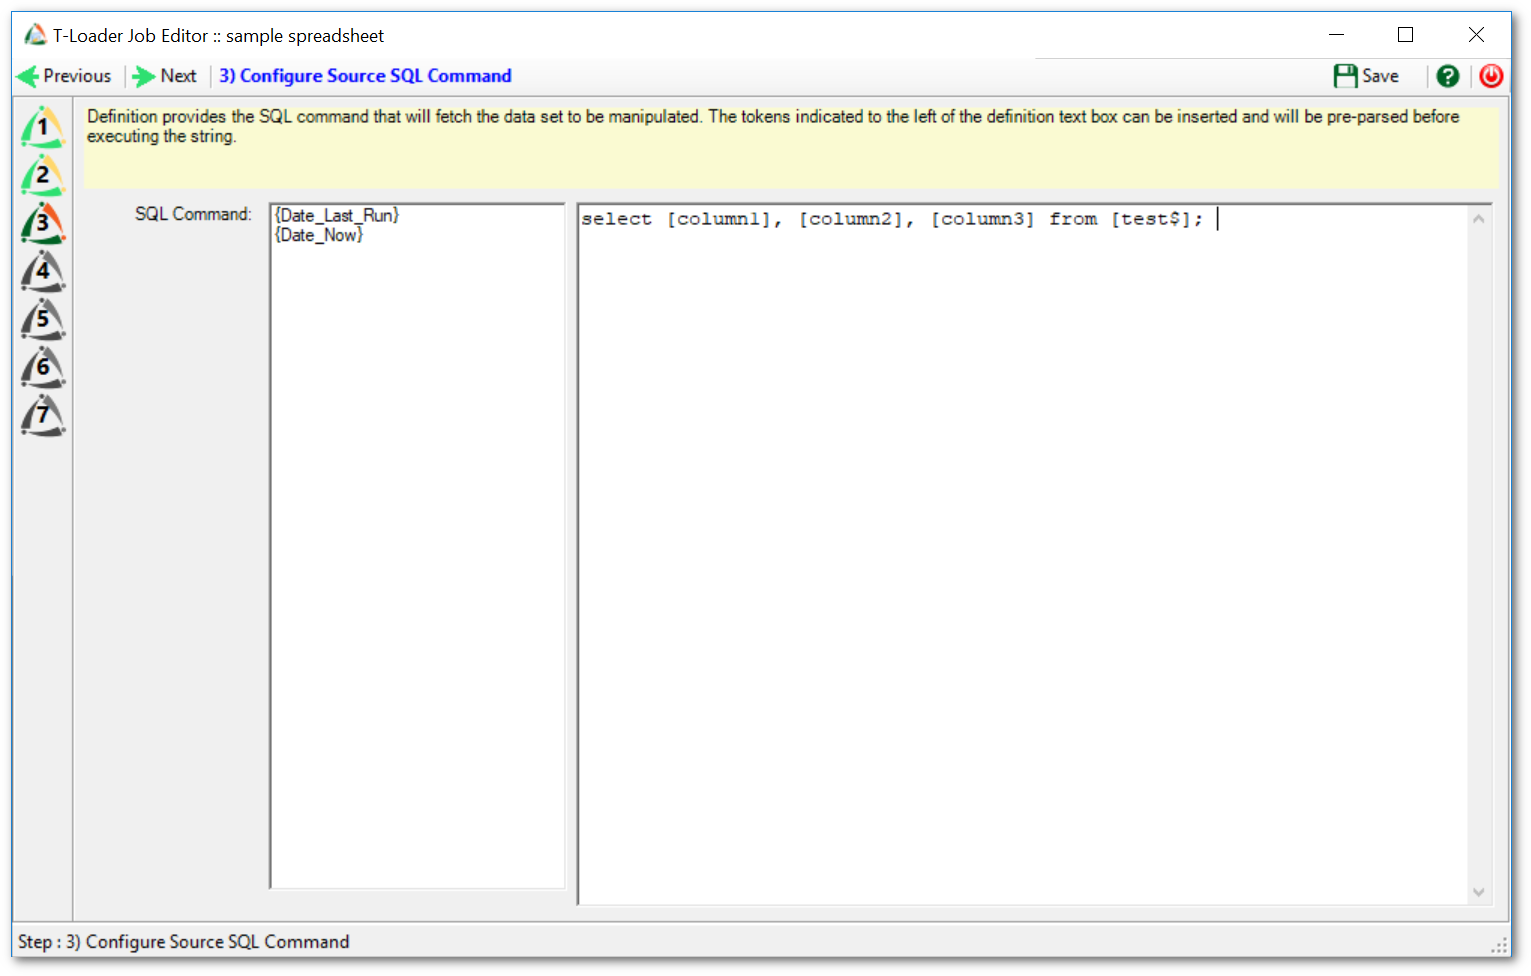
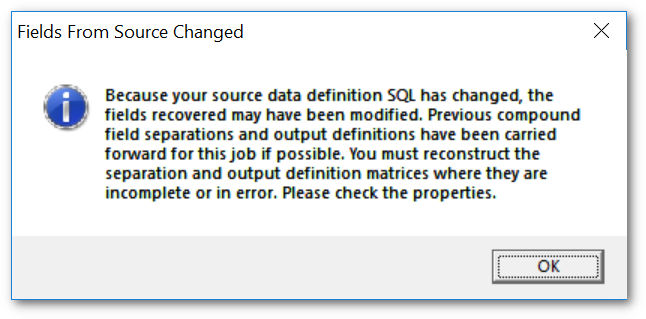
When you navigate to the next step the cache will be refreshed to allow you to proceed, returning a row of data for review in the process. Any time you change the SQL statement (or the provider resets its awareness of it) you will see this dialog box.
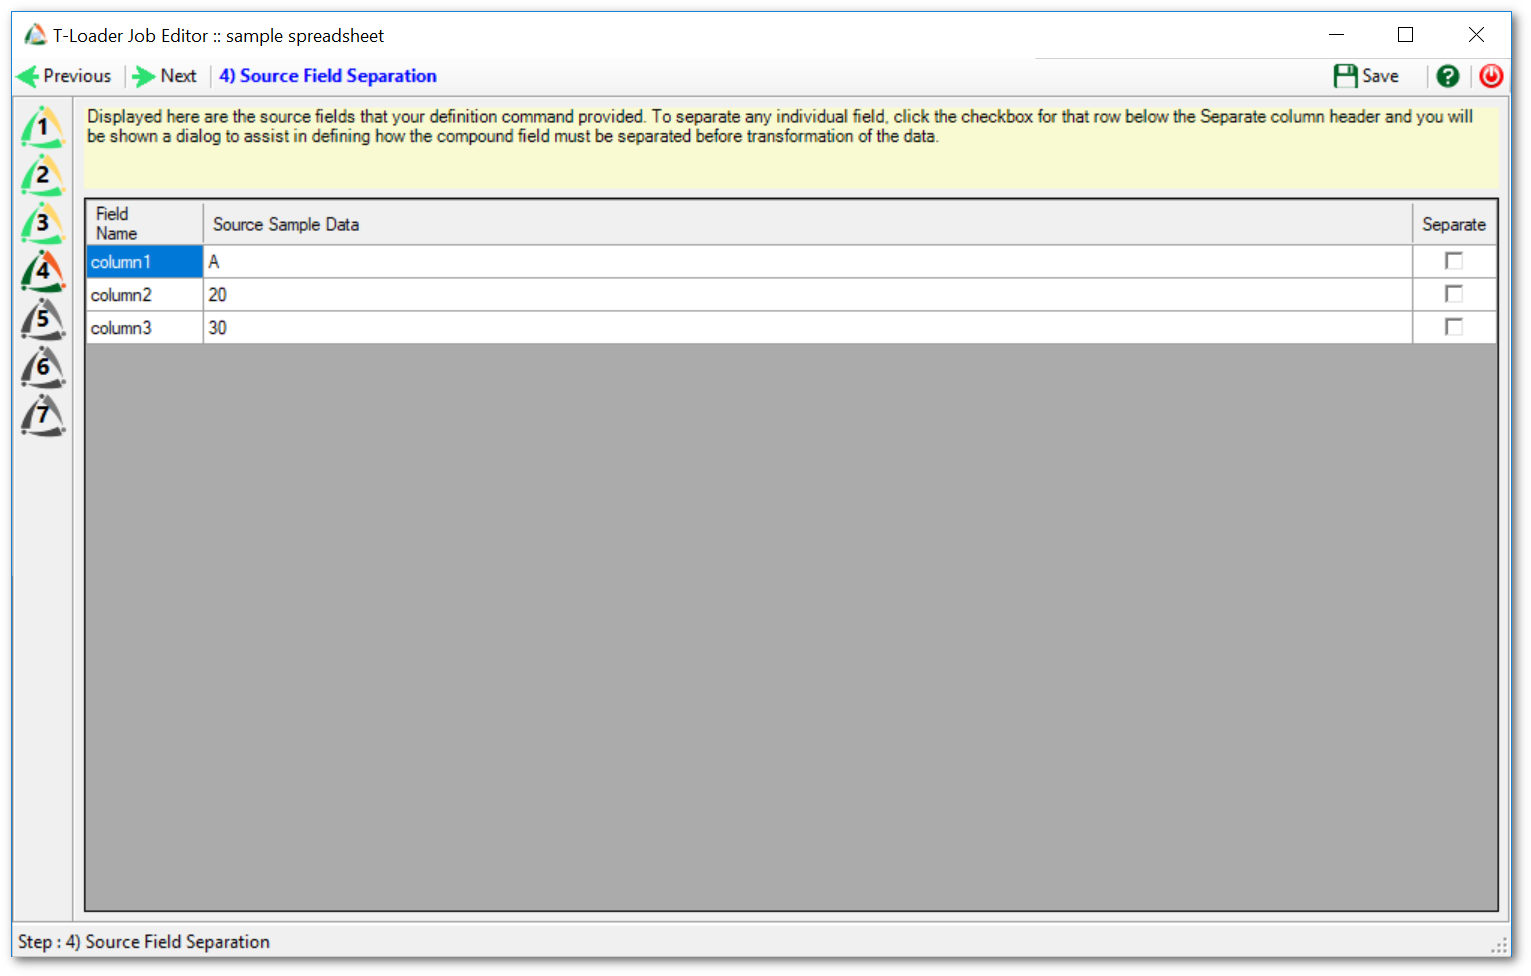
Step 4
The fourth step shows us the fields pulled by our SQL statement, along with a sample row worth of data. To really proceed with full confidence you need to have some inherent awareness of your data, because though the sample row may show the range of expected incoming data, it is a single row and other rows may not conform as expected. A common issue is that field data that is incoming may be missing (NULL), and if your insertion and update logic requires that field to have data this can affect the execution of your logic.
This review screen also allows you to sub-separate fields. You can define a separation matrix for any individual field, making part of the contents field names and part data. Here we don’t actually require that level of separation, so this remains a purely review-step.
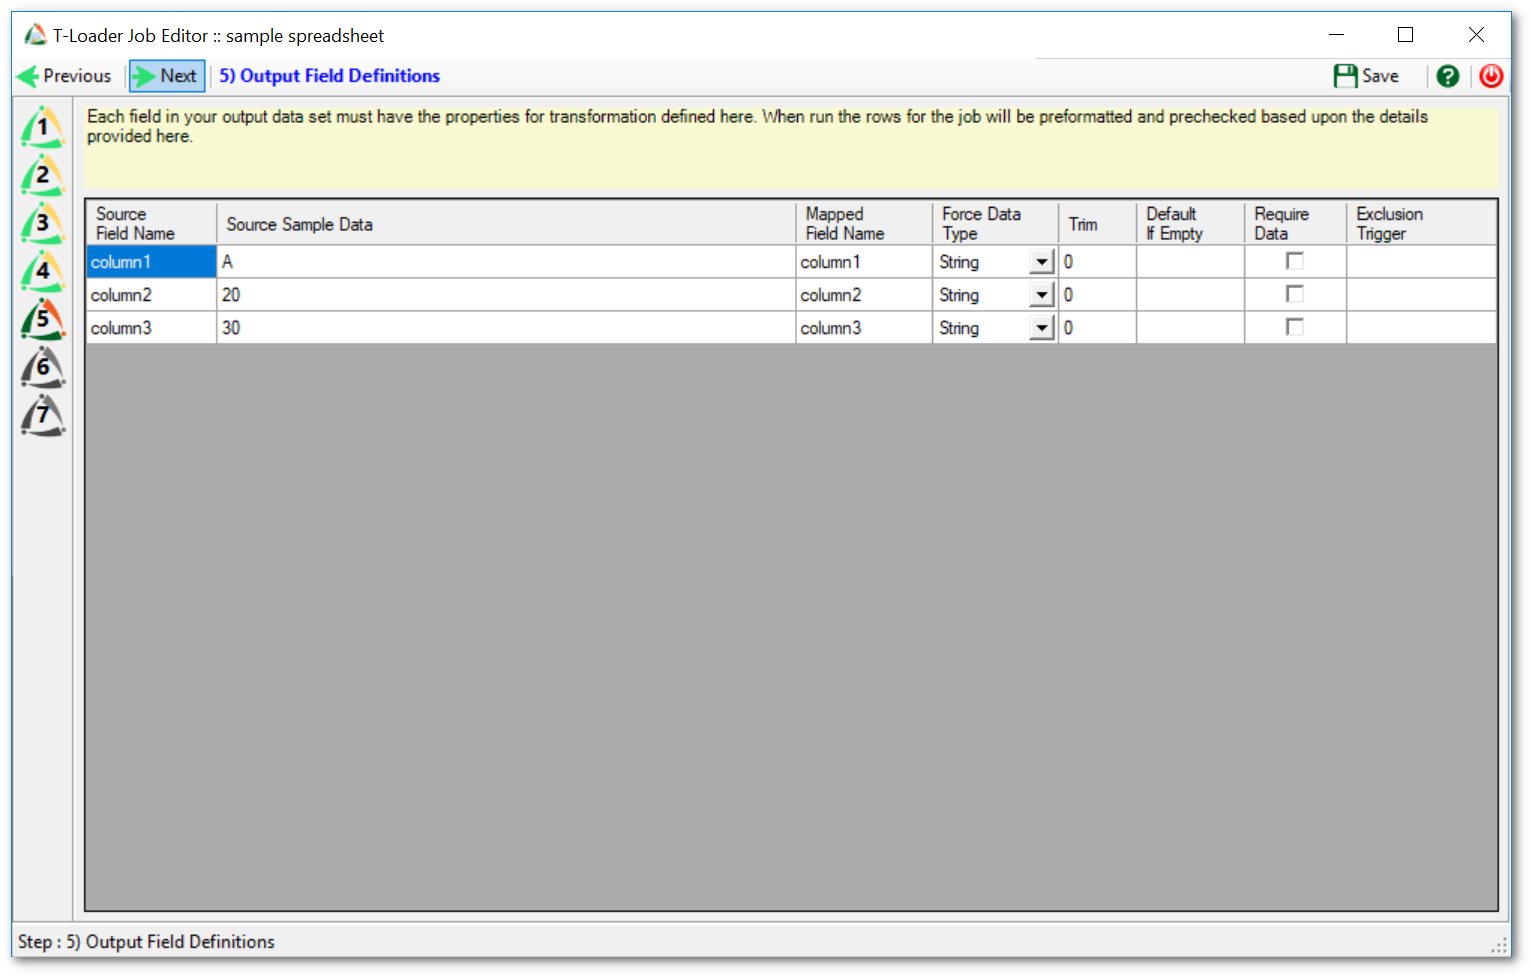
Step 5
We can now define some rules about our output fields, including:
- Renaming the fields for clarity (the mapped field name);
- Force a data type (beware this, because if incoming data cannot be conformed to your chosen data type it will create errors);
- Trim the data in the field to a certain length (handy if the target table in the destination database has limitations to what can be stored in text fields);
- Provide a default if the data incoming is missing;
- Indicate if the row requires data in that field (an error row is generated if the data is missing for a required field); and
- Define an exclusion trigger (e.g., if the field data equals some value…discard that row).
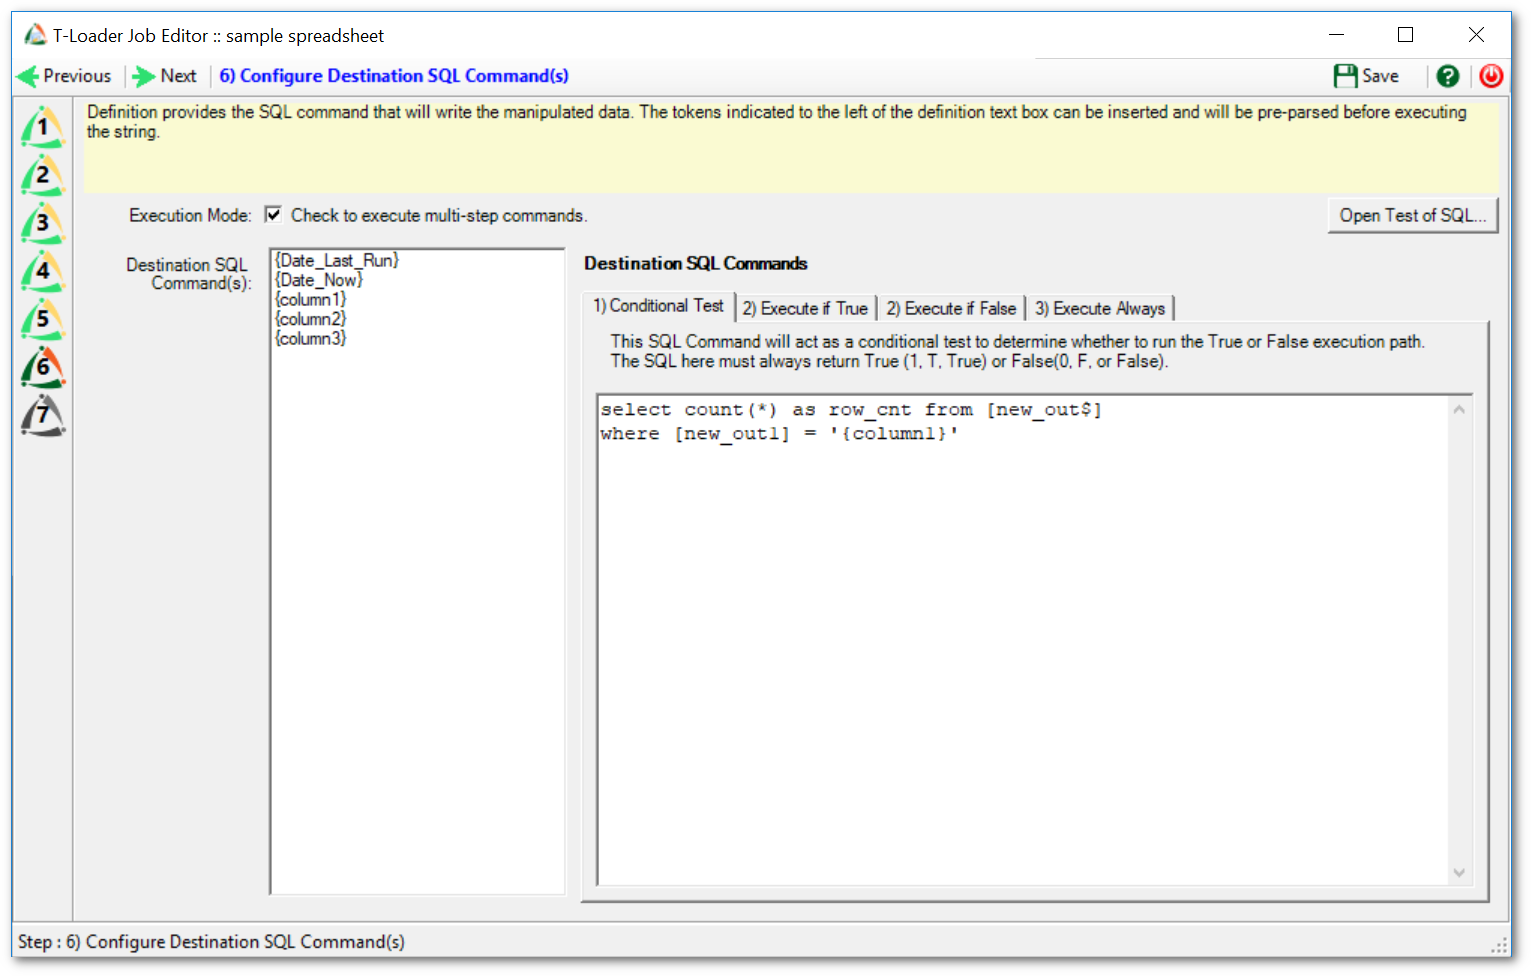
Step 6
We are now ready to define how our data should be output into the destination database. In the case of this job we want to execute some conditional SQL, so we indicated the execution mode by checking the box by that label. This means we can test for something and then execute one SQL command if true, and another if false. We also have the ability to execute a command after the conditional effort.
To design our SQL commands we can type into the boxes, and use the handy left-side field list to insert tokens that will be translated into field data from those fields when the commands are finally prepared.
On the “Conditional Test” tab our test is to SELECT and count the rows in the table named “new_out” where the “[new_out1]” field is equal to the value in the incoming “column1” field. Since a count can be converted to true or false (0 means false, 1 means true) this triggers our following logic.
On the “Execute if True” tab we provide an UPDATE command that handles all the logic we want to happen if there is a matching row. In this case we will update the data rather than insert a new row, based upon a matching {column1} value.
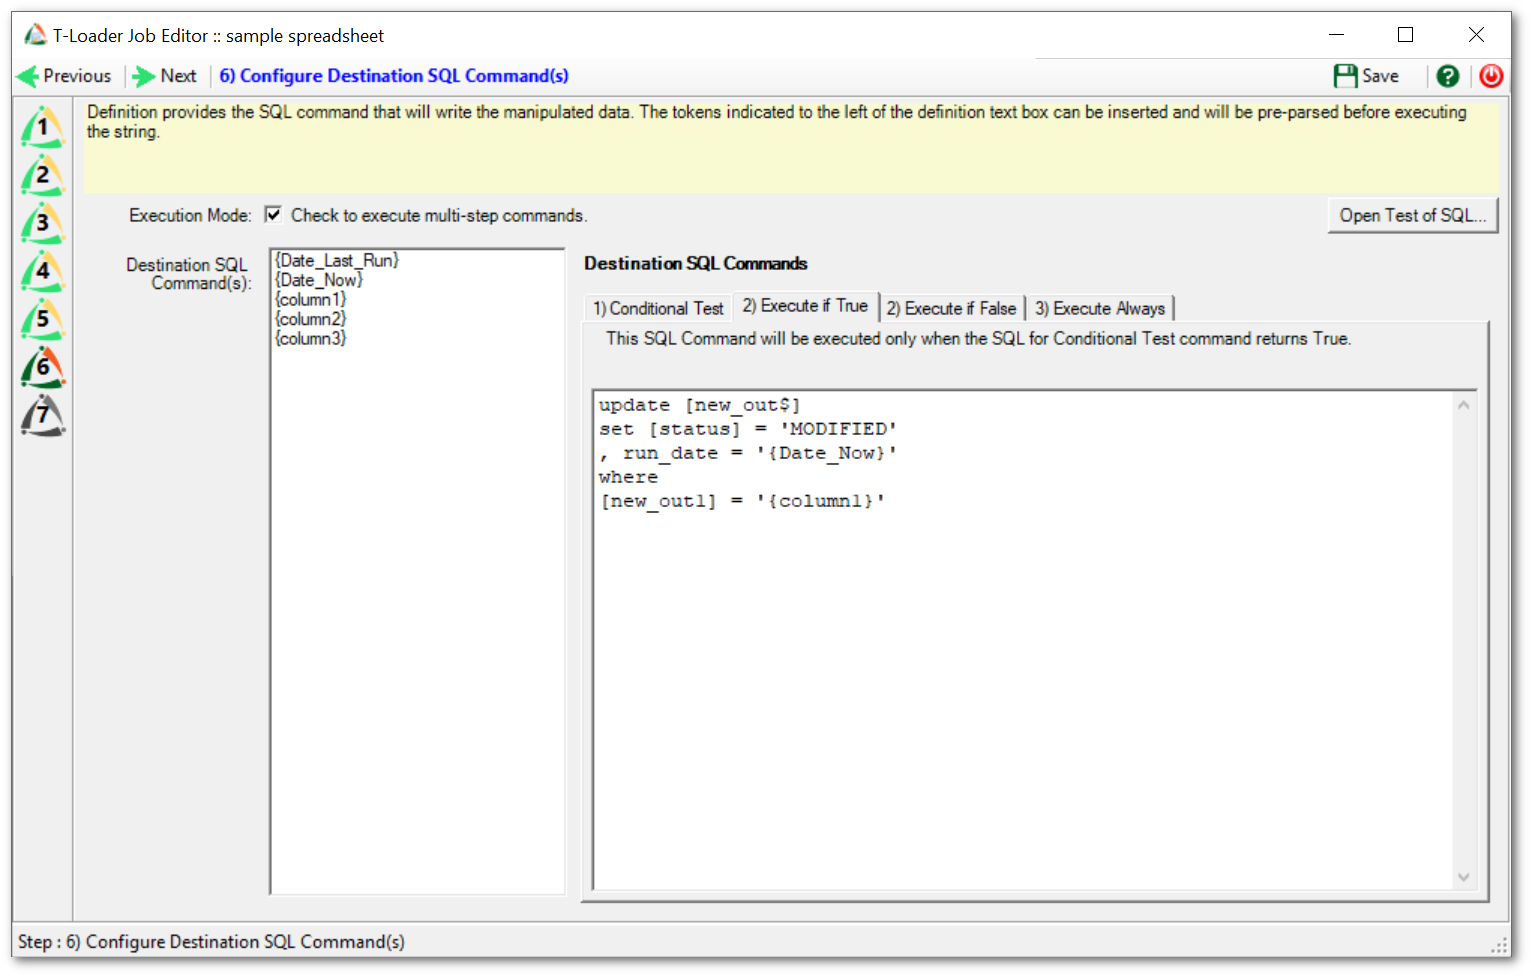
On the “Execute if False” tab we will indicate the logic that executes when the conditional test returns false (indicating now matching row). Here we decided to insert a new row, with the incoming values. We have also added two of the columns from the source and used system values to be inserted as well.
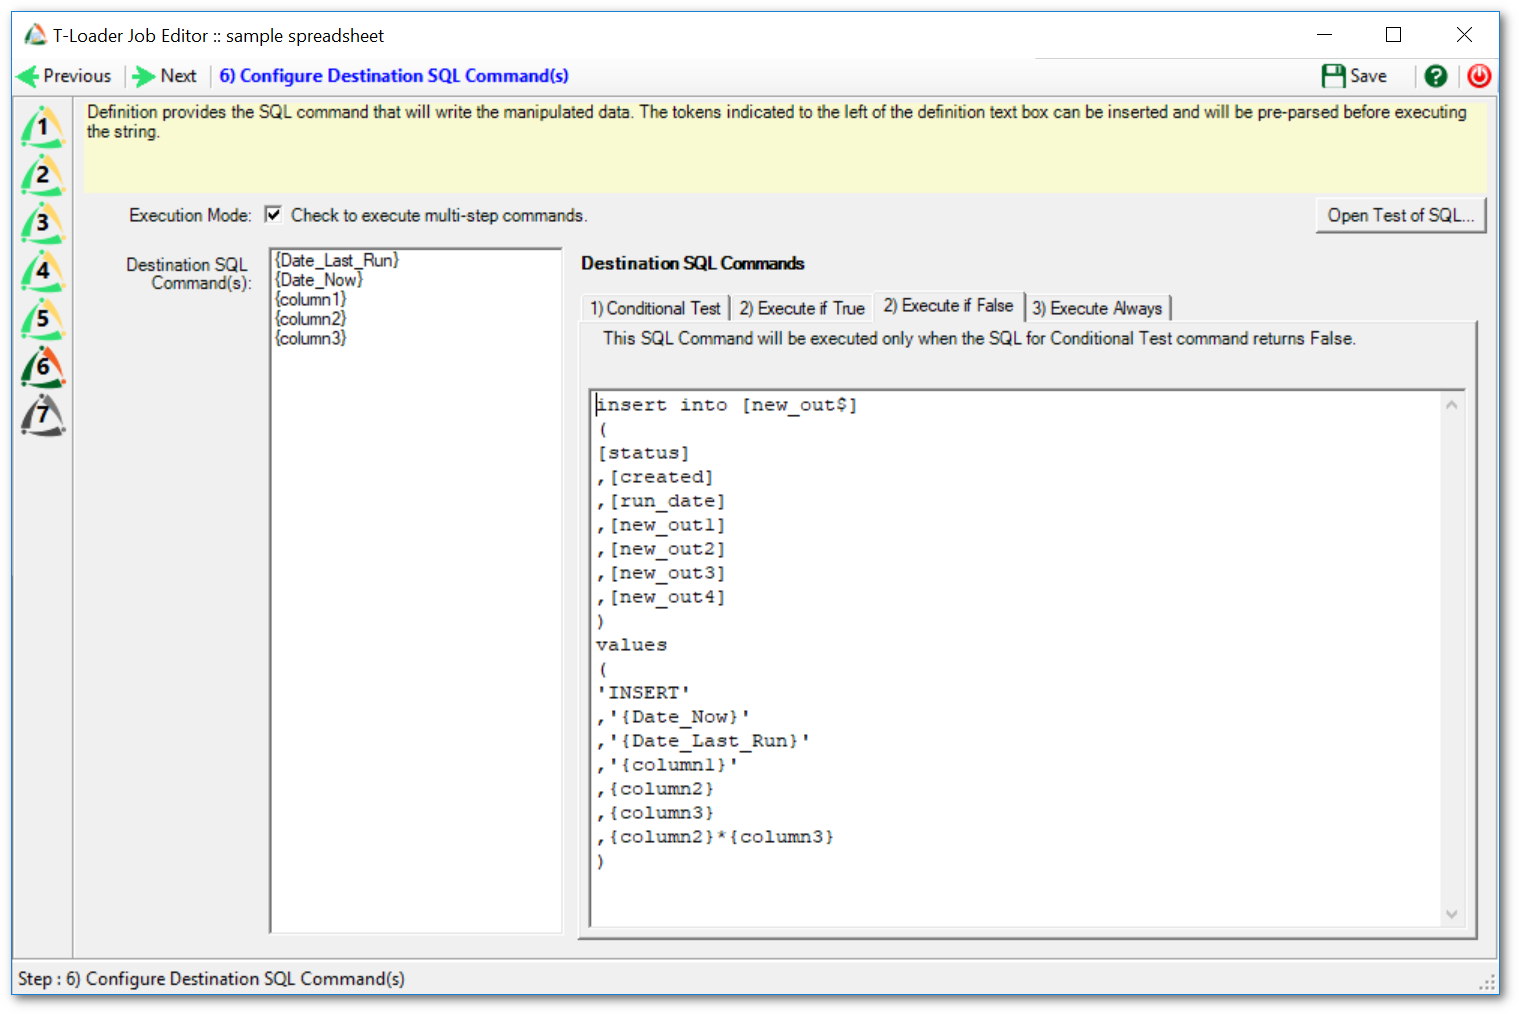
We can use the “Open Test of SQL” button in the interface to test the logic against our sample row. This can then be pasted, as desired, into a workbench product if we want to check our SQL’s validity.

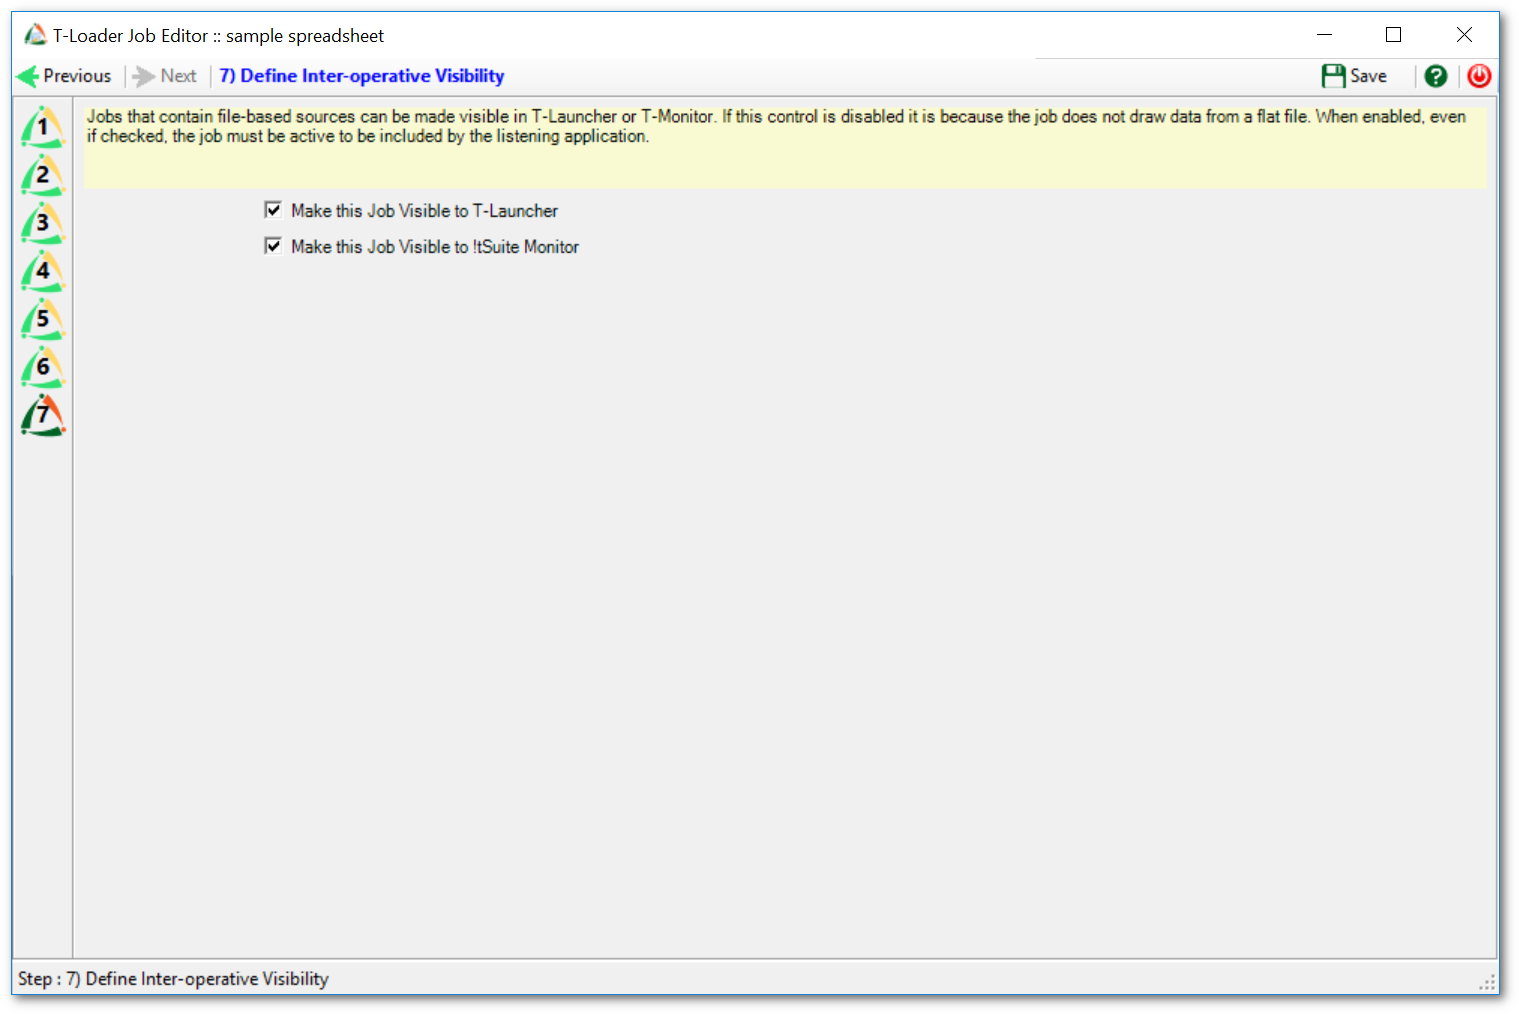
Step 7
Finally, we can set the visibility attributes for our new job before saving.
Completion
Once our job is saved we will see it in the Loader job list and to use it we:
- We change the job to Active, allowing it to run against the destination (until then it just runs as a test against the first 50 rows, producing the SQL but not executing it);
- When Active and we run the job the destination table in the MS Access database will be updated or have rows inserted based upon our logic.
Final Thoughts
The benefit of creating such a Loader job is that it will behave identically from one run to the next. This helps reduce manual labour and manage all sorts of data transfers.
Click here for the zip file that has the XML tloader job that can be imported. Along with two sample spreadsheets that can be placed in the C:\temp folder
Sample load instructions
Once you have extracted the zip perform the following
- Save the xml to your downloads directory or some place you will remember where it is
- Save the two spreadsheets to c:\temp. The sample was coded in the anticipation the two spreadsheets are in c:\temp. In reality they can be anywhere this is just for the sample
- From Tsuite, on the top you will see utilities. Click on utilities and select import. Find the xml file and say import. It will then create the job for you.
- After you have imported the job, then click on the edit icon (pencil) and walk through the steps to ensure all is working well and that you have loaded the correct MS ACCESS OLEDB driver. Once all the steps are done, then click save.
- Set the job to active
- Run the job.
Sample input spreadsheet
| column1 | column2 | column3 |
| A | 20 | 30 |
| B | 21 | 31 |
| C | 22 | 32 |
| D | 23 | 33 |
| E | 24 | 34 |
| F | 25 | 35 |
| G | 26 | 36 |
| H | 27 | 37 |
| I | 28 | 38 |
| J | 29 | 39 |
| K | 30 | 40 |
| L | 31 | 41 |
| M | 32 | 42 |
| N | 33 | 43 |
| O | 34 | 44 |
| P | 35 | 45 |
| Q | 36 | 46 |
| R | 37 | 47 |
| S | 38 | 48 |
| T | 39 | 49 |
| U | 40 | 50 |
| V | 41 | 51 |
| W | 42 | 52 |
| X | 43 | 53 |
| Y | 44 | 54 |
| Z | 45 | 55 |
| AA | 46 | 56 |
Sample output after running the job.
| status | created | run_date | run_date | new_out1 | new_out2 | New_out3 | New_out4 |
| INSERT | 2018-08-27 22:33:46 | 2018-08-27 22:32:25 | A | 20 | 30 | 600 | |
| INSERT | 2018-08-27 22:33:46 | 2018-08-27 22:32:25 | B | 21 | 31 | 651 | |
| INSERT | 2018-08-27 22:33:46 | 2018-08-27 22:32:25 | C | 22 | 32 | 704 | |
| INSERT | 2018-08-27 22:33:46 | 2018-08-27 22:32:25 | D | 23 | 33 | 759 | |
| INSERT | 2018-08-27 22:33:46 | 2018-08-27 22:32:25 | E | 24 | 34 | 816 | |
| INSERT | 2018-08-27 22:33:46 | 2018-08-27 22:32:25 | F | 25 | 35 | 875 | |
| INSERT | 2018-08-27 22:33:46 | 2018-08-27 22:32:25 | G | 26 | 36 | 936 | |
| INSERT | 2018-08-27 22:33:46 | 2018-08-27 22:32:25 | H | 27 | 37 | 999 | |
| INSERT | 2018-08-27 22:33:46 | 2018-08-27 22:32:25 | I | 28 | 38 | 1064 | |
| INSERT | 2018-08-27 22:33:46 | 2018-08-27 22:32:25 | J | 29 | 39 | 1131 | |
| INSERT | 2018-08-27 22:33:46 | 2018-08-27 22:32:25 | K | 30 | 40 | 1200 | |
| INSERT | 2018-08-27 22:33:46 | 2018-08-27 22:32:25 | L | 31 | 41 | 1271 | |
| INSERT | 2018-08-27 22:33:46 | 2018-08-27 22:32:25 | M | 32 | 42 | 1344 | |
| INSERT | 2018-08-27 22:33:46 | 2018-08-27 22:32:25 | N | 33 | 43 | 1419 | |
| INSERT | 2018-08-27 22:33:46 | 2018-08-27 22:32:25 | O | 34 | 44 | 1496 | |
| INSERT | 2018-08-27 22:33:46 | 2018-08-27 22:32:25 | P | 35 | 45 | 1575 | |
| INSERT | 2018-08-27 22:33:46 | 2018-08-27 22:32:25 | Q | 36 | 46 | 1656 | |
| INSERT | 2018-08-27 22:33:46 | 2018-08-27 22:32:25 | R | 37 | 47 | 1739 | |
| INSERT | 2018-08-27 22:33:46 | 2018-08-27 22:32:25 | S | 38 | 48 | 1824 | |
| INSERT | 2018-08-27 22:33:46 | 2018-08-27 22:32:25 | T | 39 | 49 | 1911 | |
| INSERT | 2018-08-27 22:33:46 | 2018-08-27 22:32:25 | U | 40 | 50 | 2000 | |
| INSERT | 2018-08-27 22:33:46 | 2018-08-27 22:32:25 | V | 41 | 51 | 2091 | |
| INSERT | 2018-08-27 22:33:46 | 2018-08-27 22:32:25 | W | 42 | 52 | 2184 | |
| INSERT | 2018-08-27 22:33:46 | 2018-08-27 22:32:25 | X | 43 | 53 | 2279 | |
| INSERT | 2018-08-27 22:33:46 | 2018-08-27 22:32:25 | Y | 44 | 54 | 2376 | |
| INSERT | 2018-08-27 22:33:46 | 2018-08-27 22:32:25 | Z | 45 | 55 | 2475 | |
| INSERT | 2018-08-27 22:33:46 | 2018-08-27 22:32:25 | AA | 46 | 56 | 2576 |
More information
Please refer to knowledge base articles regarding
|
Description |
Link |
|
Excel to Access |
|
|
Connect to Excel |
|
|
N/A |
N/A |
|
N/A |
N/A |
|
N/A |
N/A |
keywords
HOW TO, Job creation, Excel, step by step, Spreadsheet,